Form Templates
Form Templates allow for the customization of inspection lists and the pre-filling of report fields. Once saved, they are available for selection when creating a new Inspection, and when adding a new Inspection Form to an existing Inspection.
Templates are critical to an efficient inspection workflow on-site. Eneris allows for easy customization of templates and includes the most commonly used templates in US and Canadian markets to help you get started quickly.
If there is a template you would like to see, we would love to hear about it.
Form templates allow you to:
- Customize what categories (e.g. Roof, Plumbing, HVAC) and components (e.g. Roof Coverings, Water Heater, Heating System) are included.
- Define the Shared Fields that appear within each component (e.g., Perhaps you would like the Description, Condition, Risk, and Recommend Action fields to appear in every component).
- Define component specific fields (e.g., Only the
Heating Systemscomponent would have the Heating Energy Source, Heating System Type, and Heating System Brand fields). - Set up field options so your responses are consistent, fast, and standardized.
- Select default entries (e.g., General limitation statements may be the same for every inspection).
How you setup and use Form Templates is completely up to you.
- You can stick to using our default templates.
- You can create a master template for use in all your inspections.
- You can create templates for specific property types (e.g., If you inspect a lot of apartments you may want to create a new template that does not include components like
FireplaceorGuttersas they would not be relevant).
Once created, Form Templates can be reused across multiple inspections, saving time and improving report consistency.
Default Form Templates
The following default Form Templates are available in Eneris:
General
- Eneris template
- A custom template developed by Eneris that incorporates the best parts of the ASHI, InterNACHI, CAHPI, HIABC, and ASTTBC inspection templates.
Associations
- American Society of Home Inspectors (ASHI) template
- International Association of Certified Home Inspectors (InterNACHI) template
- Home Inspectors Association BC (HIABC) template
- Applied Science Technologists & Technicians of BC (ASTTBC) template
- American Home Inspectors Training (AHIT) template
- Canadian Association of Home & Property Inspectors (CAHPI) template
If there is a template you would like to see, we would love to hear about it.
Review default Form Templates
Follow these steps to review the default Form Templates:
- Select
Form templatesfrom the sidebar.
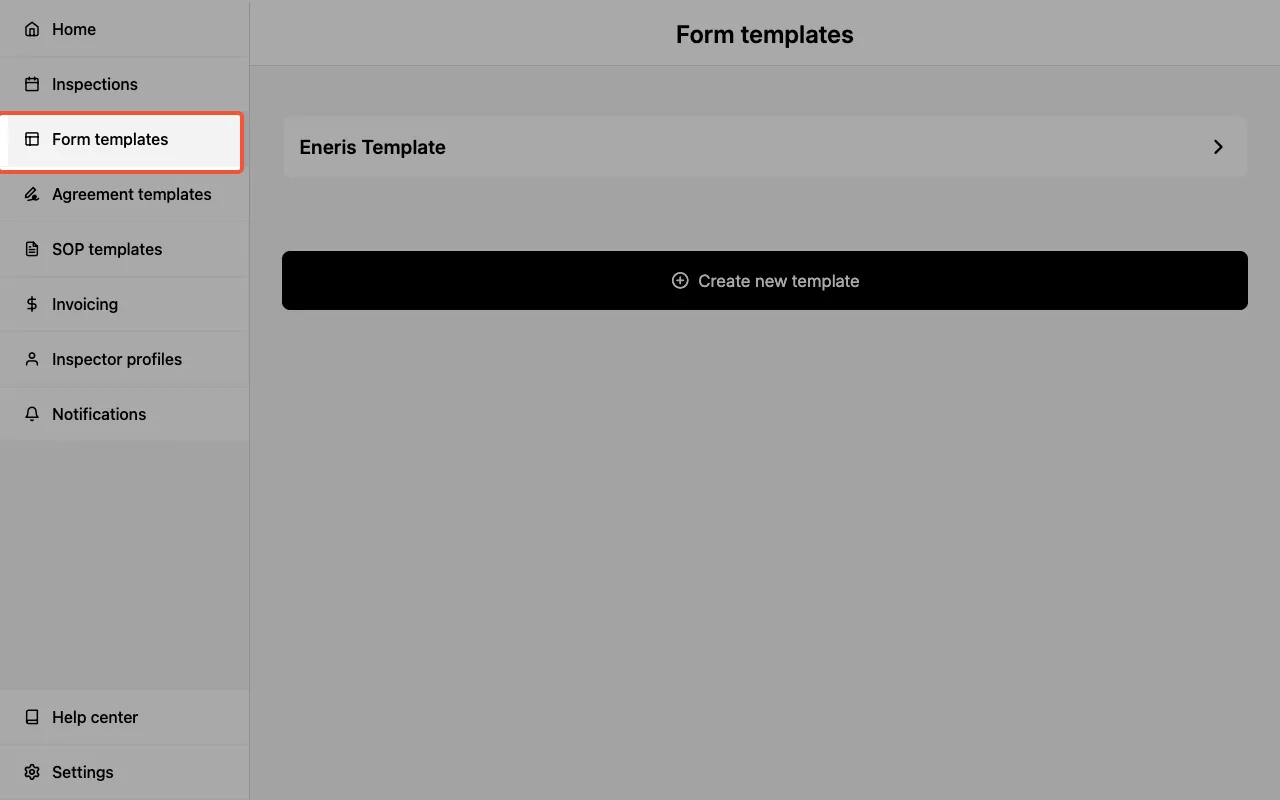
- Select
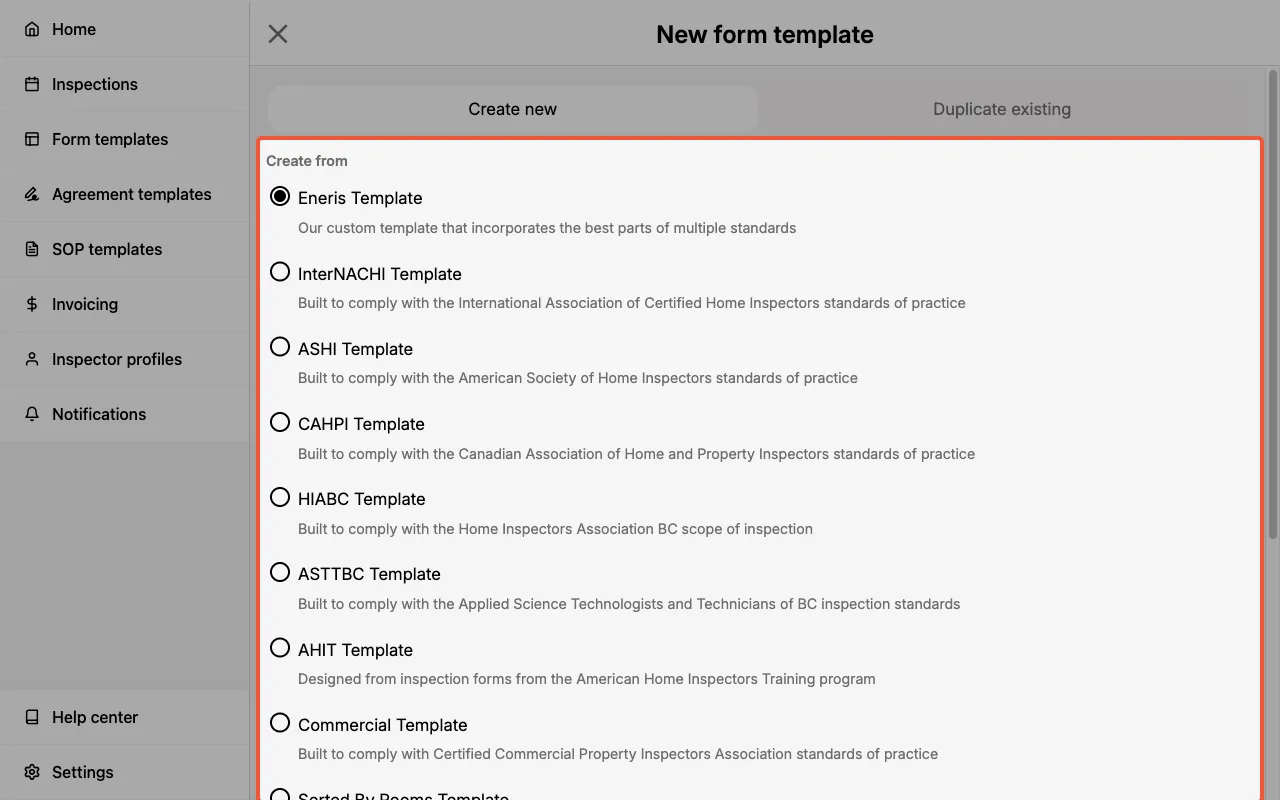
Create new form template. - Select the template you are interested in (or create a
Blank Template).
- Enter a name for your new template.
- Select
Create new. - Select the new Form Template you just created and explore the various inspection categories.
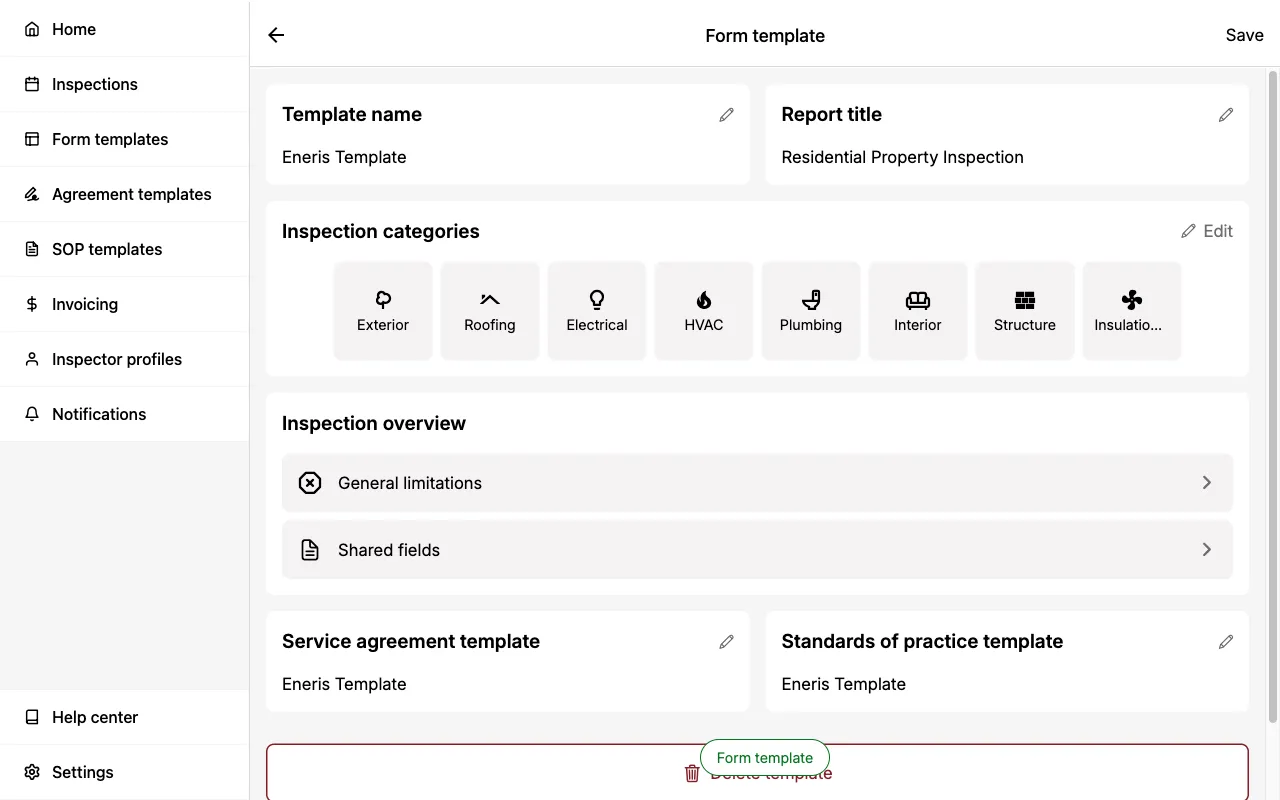
As seen above, Eneris includes a wide range of ready to use inspection templates. These templates were created after careful consideration of the Standards of Practice (SOP) for various regions.
- Eneris Template blends required items from major inspection associations in North America to produce a coherent template with great coverage on the most common subjects encountered during an inspection.
- ASHI Template corresponds to the American Society of Home Inspectors SOP.
- InterNACHI Template corresponds to the International Association of Certified Home Inspectors SOP.
- AHIT Template corresponds to paper forms that were traditionally used by inspectors trained by AHIT.
- HIABC and ASTTBC Templates correspond to their respective associations in the province of British Columbia, Canada.
- CAHPI Template corresponds to the Canadian Association of Home & Property Inspectors SOP.
You can also attach SOP Templates to your Form Templates to include Standards of Practice documentation in your inspection reports.
Creating a Form Template
To create a new Form Template:
- Select
Form templatesfrom the sidebar. - Select
Create new form template.
- If you would like to create your new template using an existing template as a baseline select one from the list. Otherwise, scroll to the bottom of the list and select
Blank Templateto start with a clean slate.
- Enter a name for your new template.
- Select
Create new.
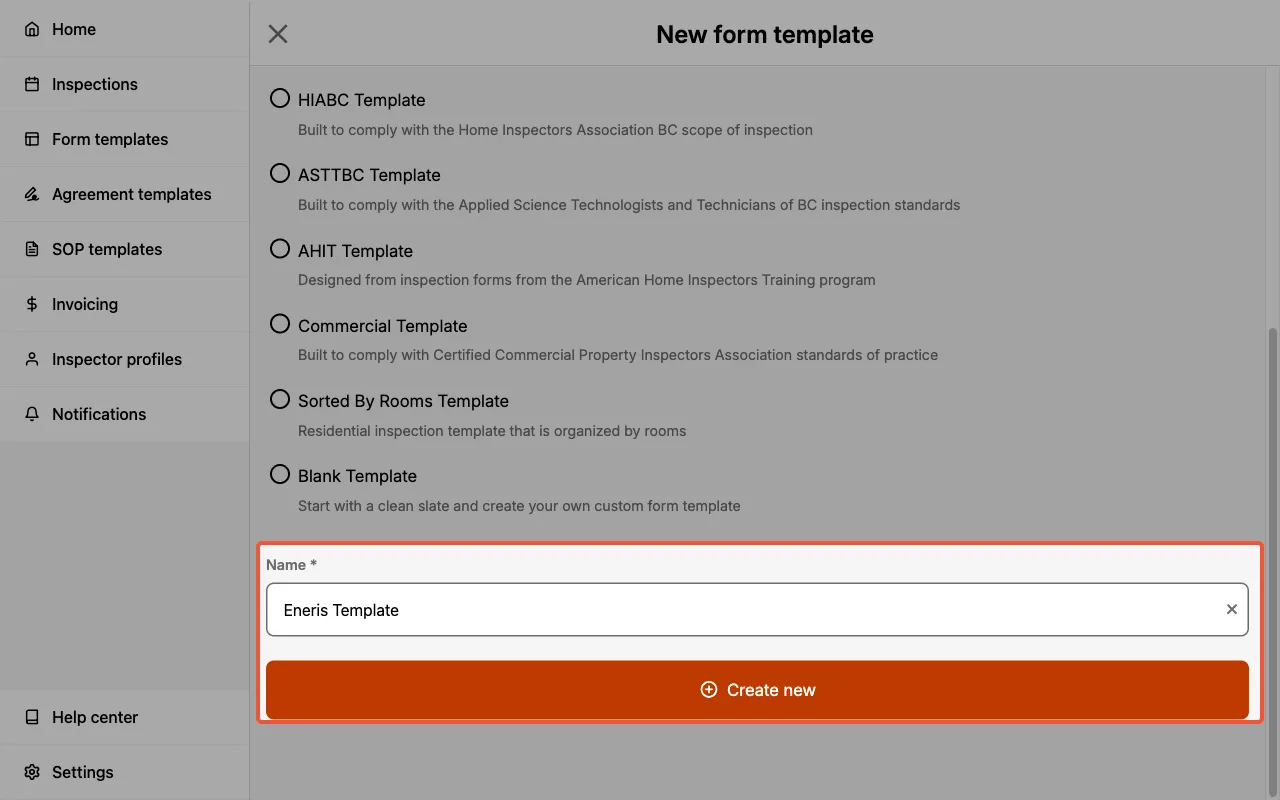
- Edit your new template, as desired.
You can always edit the Form Template at any time.
- Changes to a Form Template are only reflected on any new inspection that is created after the template change.
Form Template sections
A Form Template is laid out like the Inspection Forms made from it. The top of the page carries the Template name and Report title, followed by Refine from inspection form and the Inspection categories. Everything else sits in tabs below them.
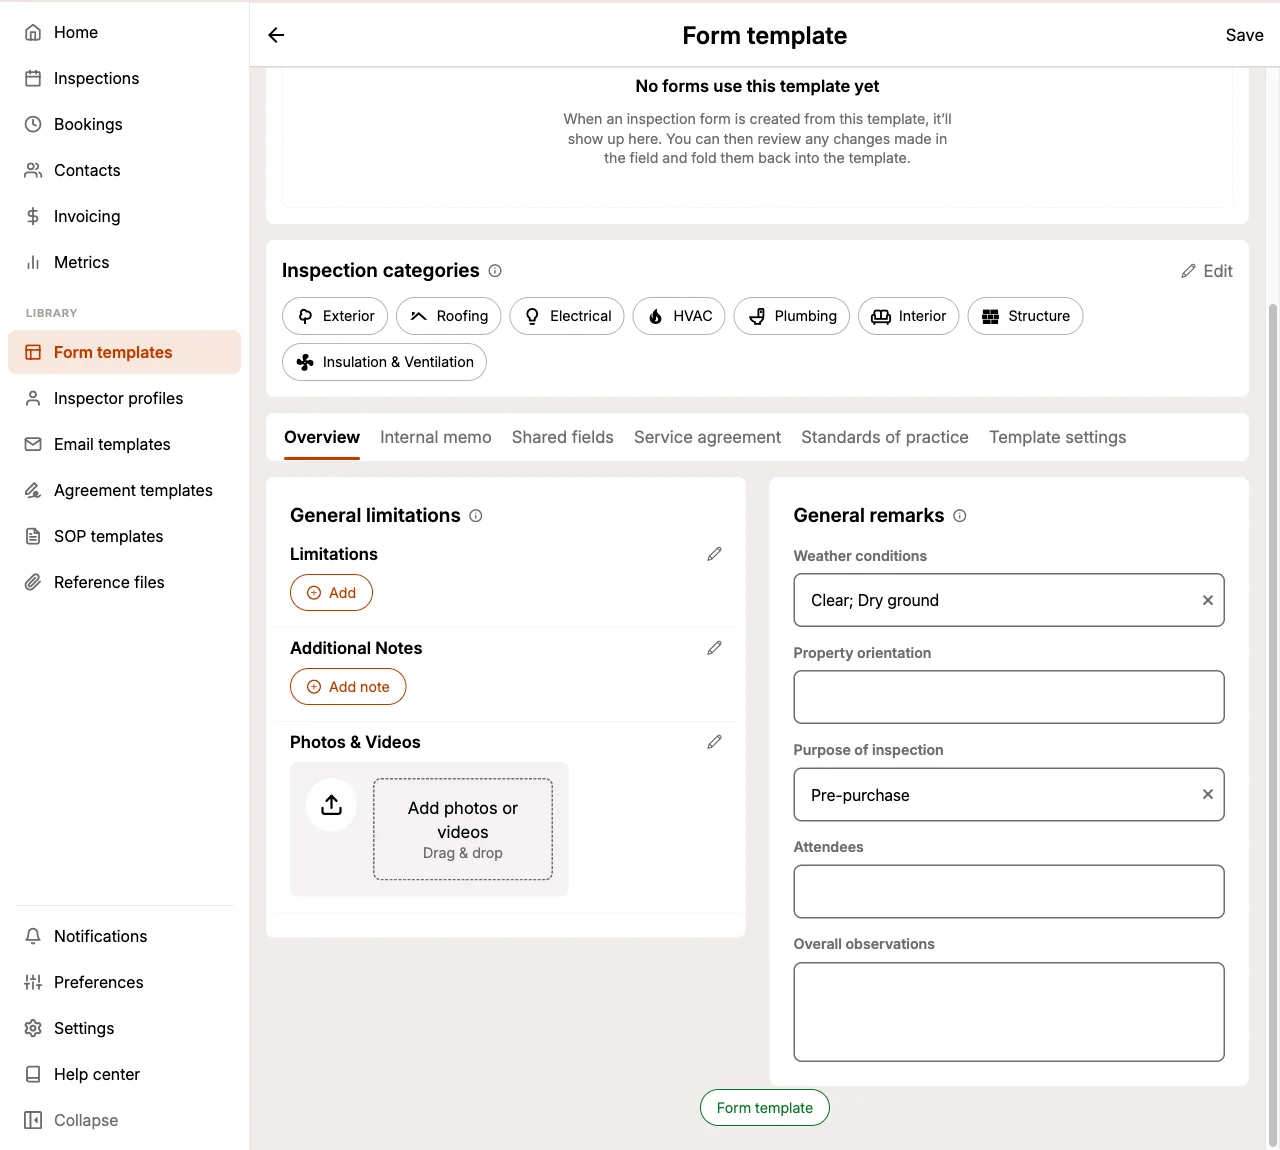
| Tab | What it holds |
|---|---|
| Overview | Default General limitations and General remarks |
| Internal memo | A default Internal memo |
| Shared fields | The shared fields that appear in every component |
| Service agreement | The Service Agreement Template attached to this template |
| Standards of practice | The SOP Template attached to this template |
| Template settings | Delete this template |
Deleting a Form Template does not touch the Inspection Forms already created from it.
Context defaults
Two of the form's context fields can be pre-filled on the template, so every new Inspection Form starts from them instead of an empty field.
Both work the same way: the values are copied onto the form at the moment it is created, and the form keeps its own copy from then on. Editing a template never changes a form that already exists.
Property details cannot be set on a template. They describe one specific property, so every Inspection Form starts with them blank. See Property details.
General remarks default
Set the General remarks that most of your jobs share, such as a standard purpose of inspection. Leave any field blank to fill it in per inspection.
These remarks are shared with your client and appear in the report under General Information.
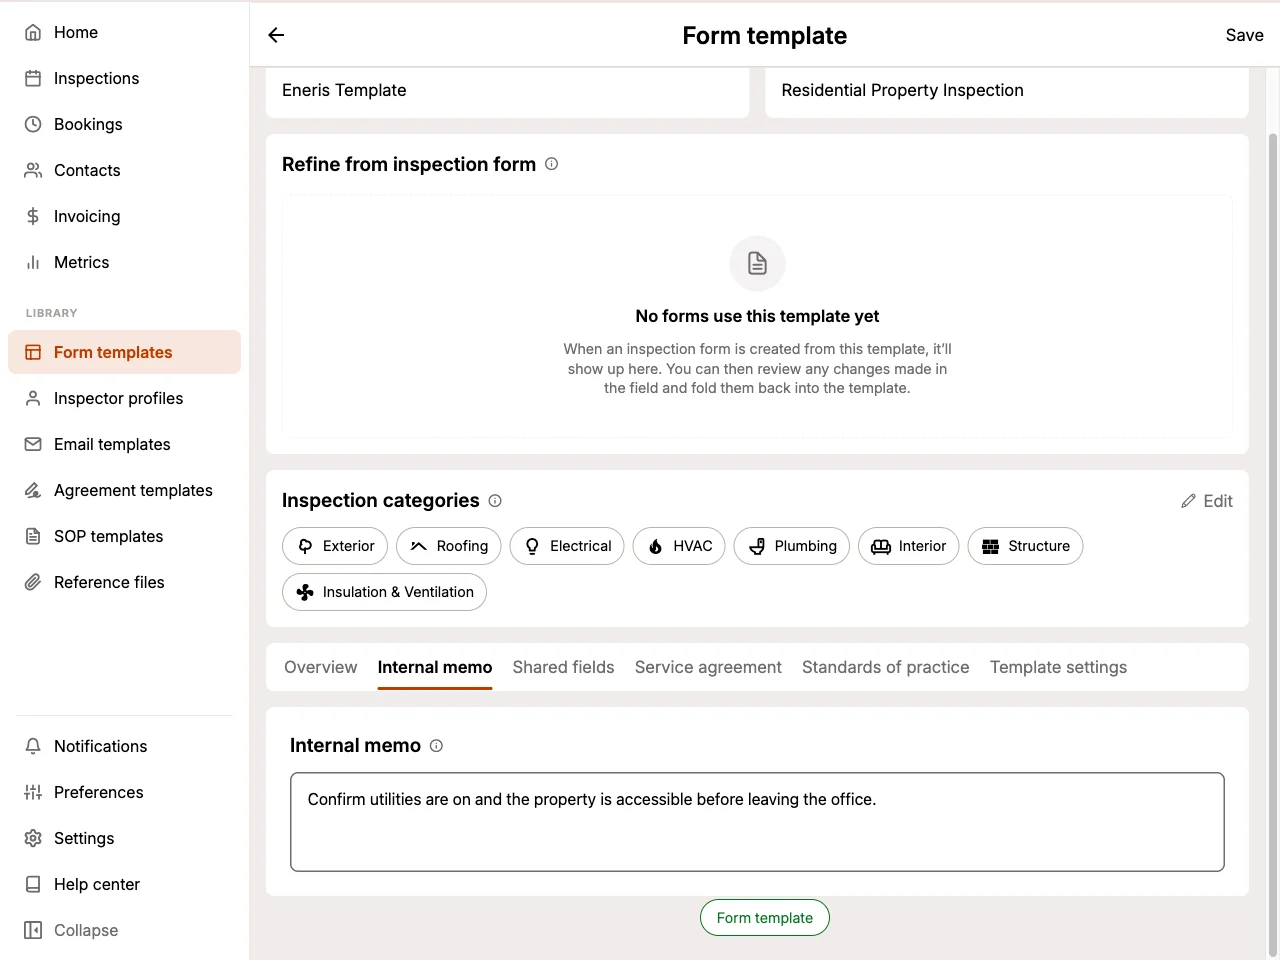
Internal memo default
Set an Internal memo for every new form created from this template, such as a reminder your inspectors should see on every job.
The memo stays private to you and your team. It is never shared with clients and never appears in a report.
Selecting a Form Template
There are two ways to add a Form Template to an inspection.
Adding a Form Template when Creating a New Inspection
When creating a new inspection you must select a Form Template:
- Begin creating a new Inspection.
- Select the
Form Templatedropdown. - Select the desired Form Template.
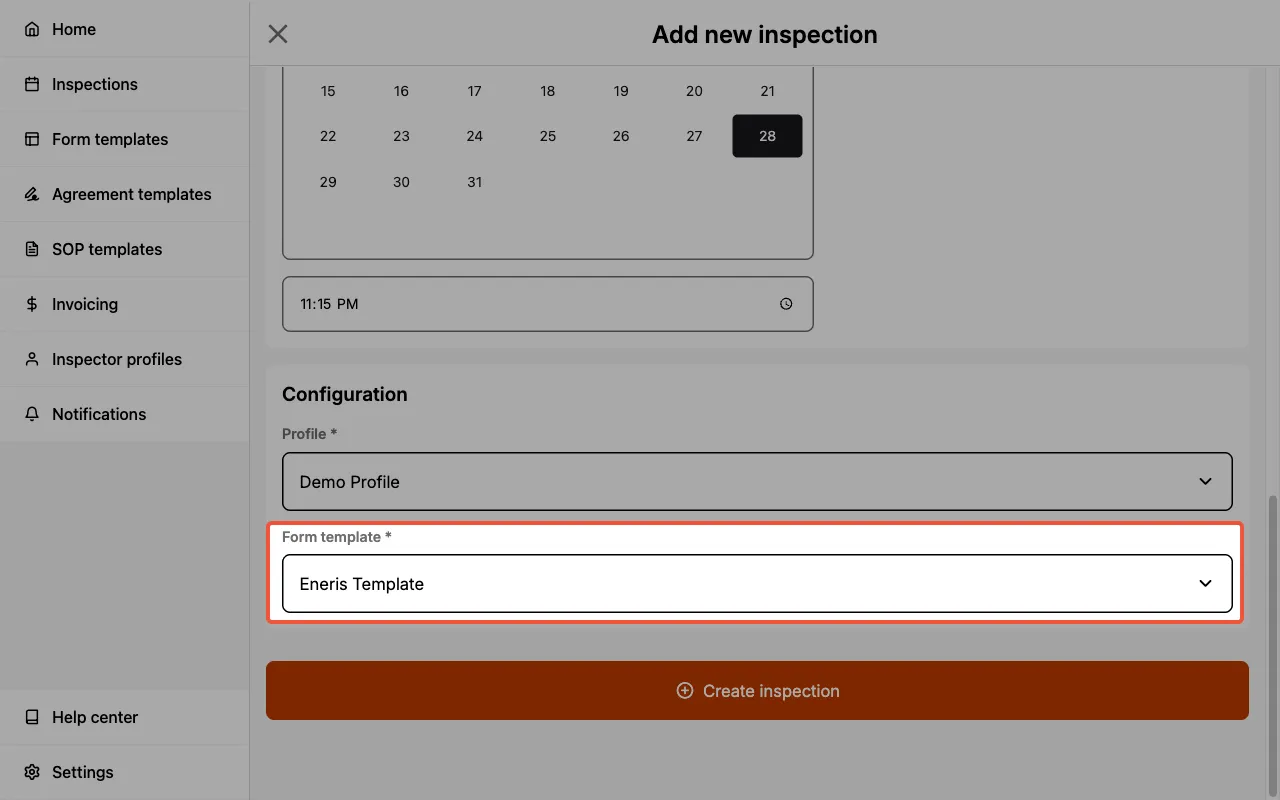
- Select
Create inspection. - The Form Template is now loaded into the inspection, ready for use.
Adding a Form Template to an Existing Inspection
- Open the Inspection you wish to add a new Form Template to.
- Navigate to the Inspection Forms section.
- Select
Add new.
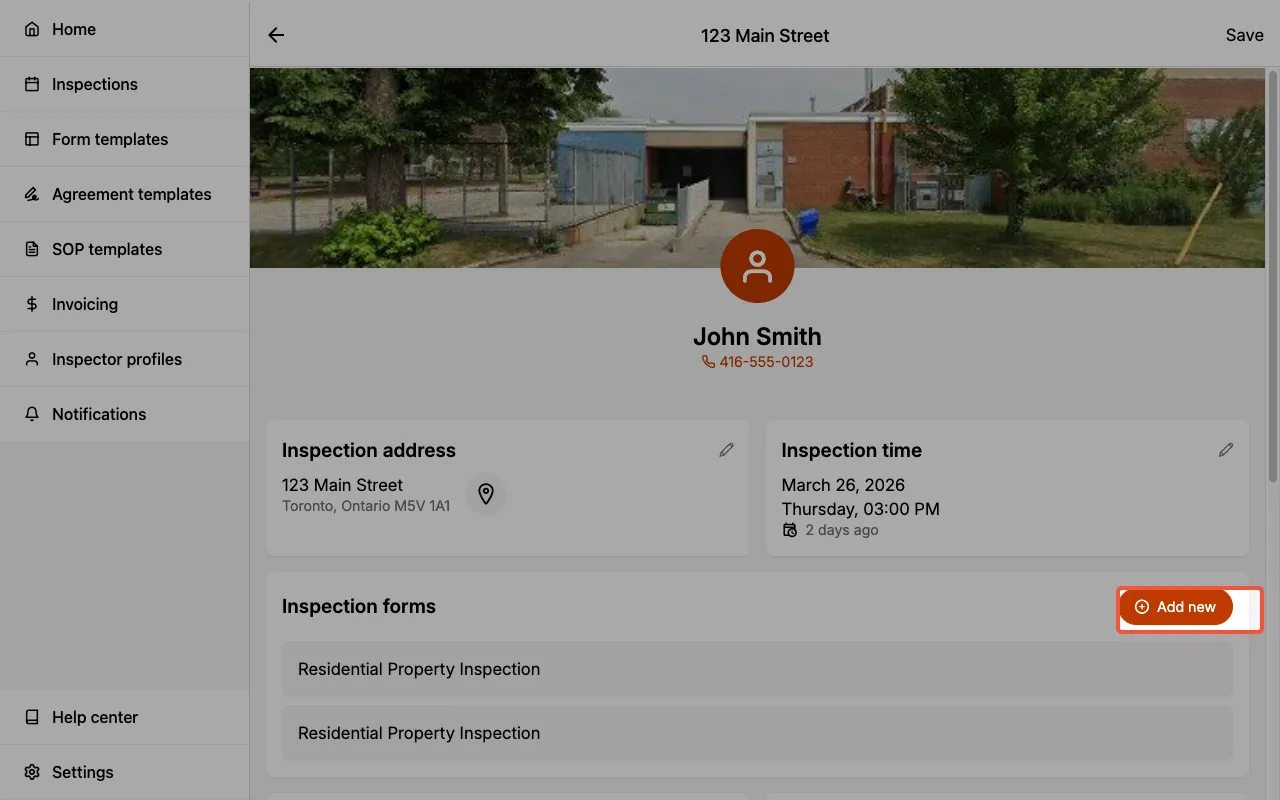
- Select the desired Form Template.
- The Form Template has been successfully loaded as an Inspection Form in the Inspection.
Reminder: Each Inspection can have one or more Inspection Forms associated with it. Inspection Forms allow you to associate different types of inspections with a single inspection site visit.
Applying Inspection Form changes to the Form Template
Changes made directly in an Inspection Form are not automatically saved into your Form Template. Instead, the Refine form template feature lets you review every change you made in the field and choose exactly which ones to merge back into the template. Improvements you make during one inspection, such as a new component or a renamed field, can become a permanent part of the template for all future inspections.
The review detects changes across the entire form, including:
- Added, removed, or renamed categories, components, fields, and field options.
- Changes to field settings, such as field requirement and field visibility.
- Changes to favorite options.
- Reordered categories, components, fields, and field options.
Refining a Form Template requires permission to edit Form Templates, which the ADMIN and SCHEDULER roles have. The built-in demo template cannot be refined.
Starting a review from an Inspection Form
- Open the Inspection Form containing the changes you would like to review.
- Locate the Refine form template section. It shows the name of the Form Template this form was created from.
- Select
Review changes.
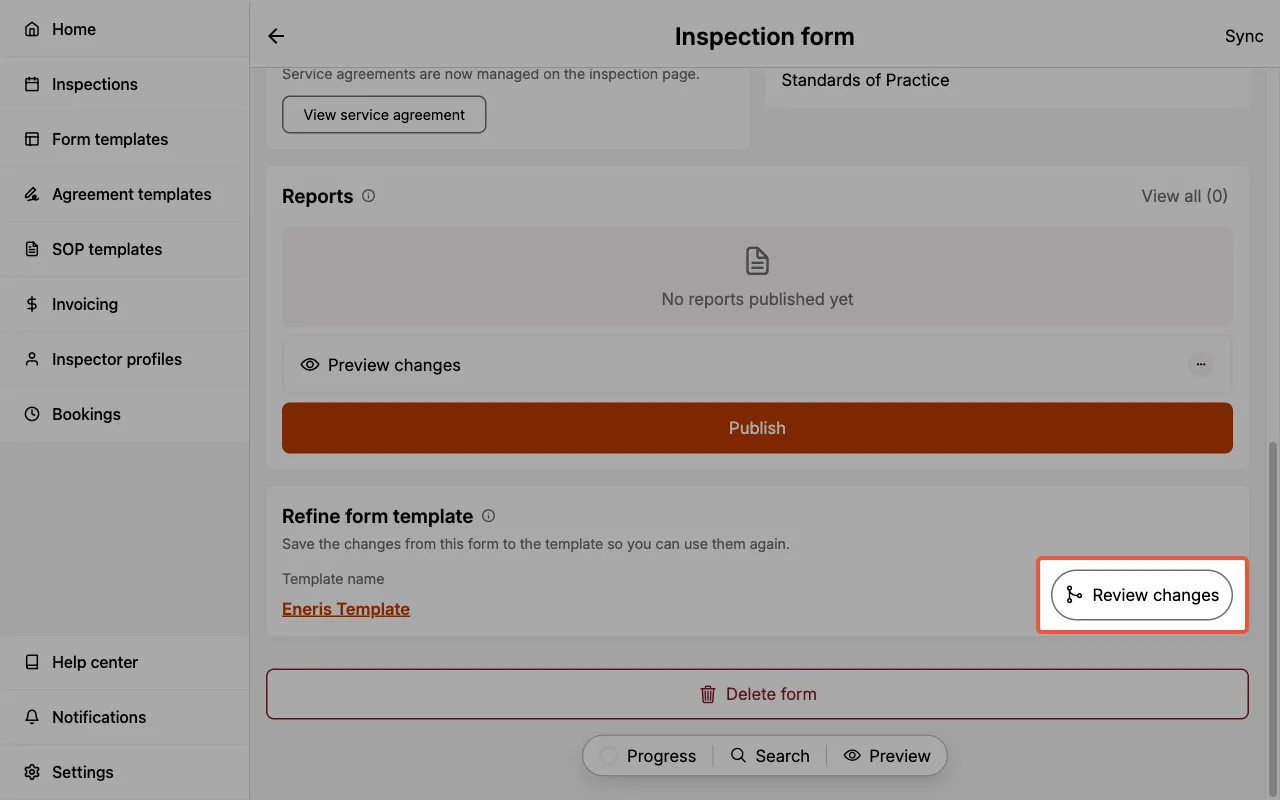
After publishing a report, the confirmation message also offers a Refine template shortcut that takes you straight to the same review.
Starting a review from a Form Template
- Open the Form Template you would like to refine.
- Locate the Refine from inspection form section. It lists the Inspection Forms created from this template, for inspections in the last 14 days.
- Select the form containing the changes you would like to review.
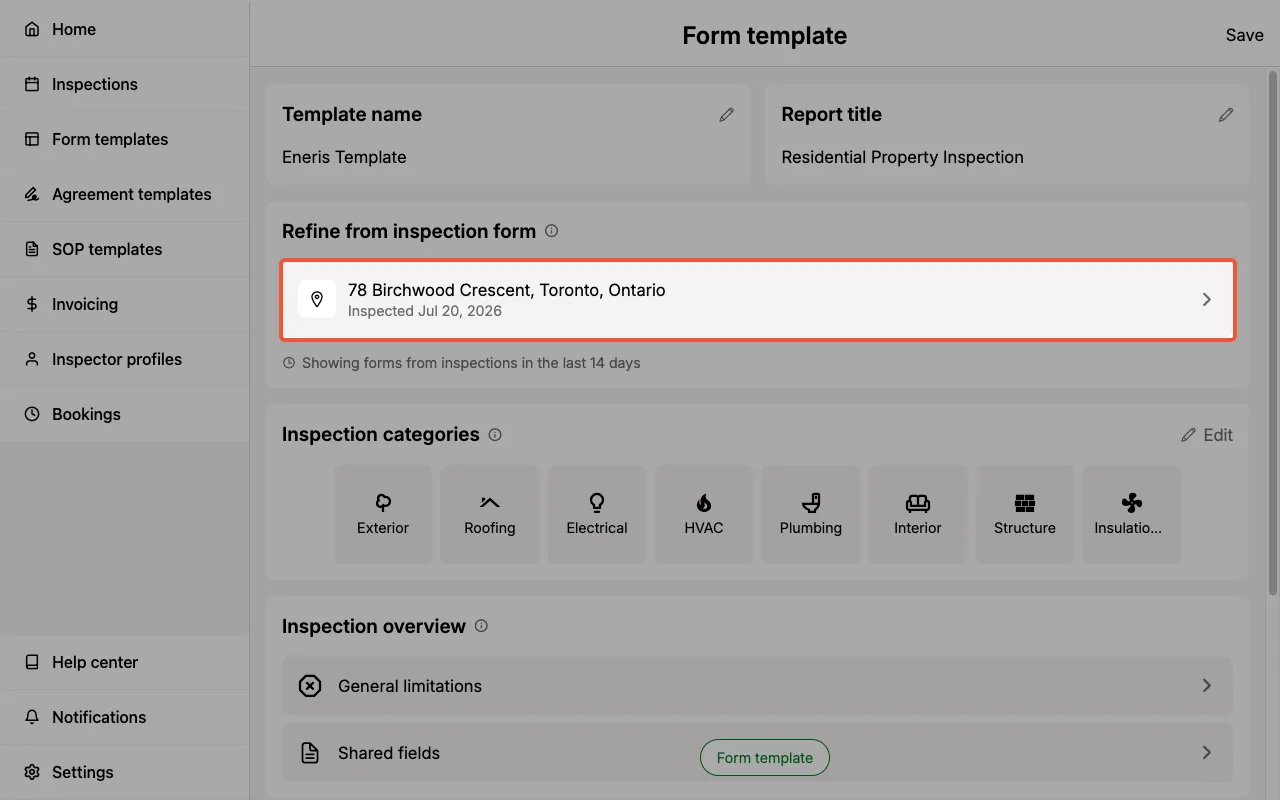
Reviewing changes
The Refine Template page lists every difference between the Inspection Form and its Form Template, grouped by category. Each change is labeled New, Removed, or Modified, and selecting a change shows its details. For example, a renamed component displays the old and new names side by side.
For each change, select Accept to keep it or Reject to skip it. You can also accept or reject all changes in a category at once. The filter chips at the top of the page (All, Accepted, Pending, New, Removed, Modified) help you work through longer lists, and the progress bar at the bottom tracks how many changes you have decided on.
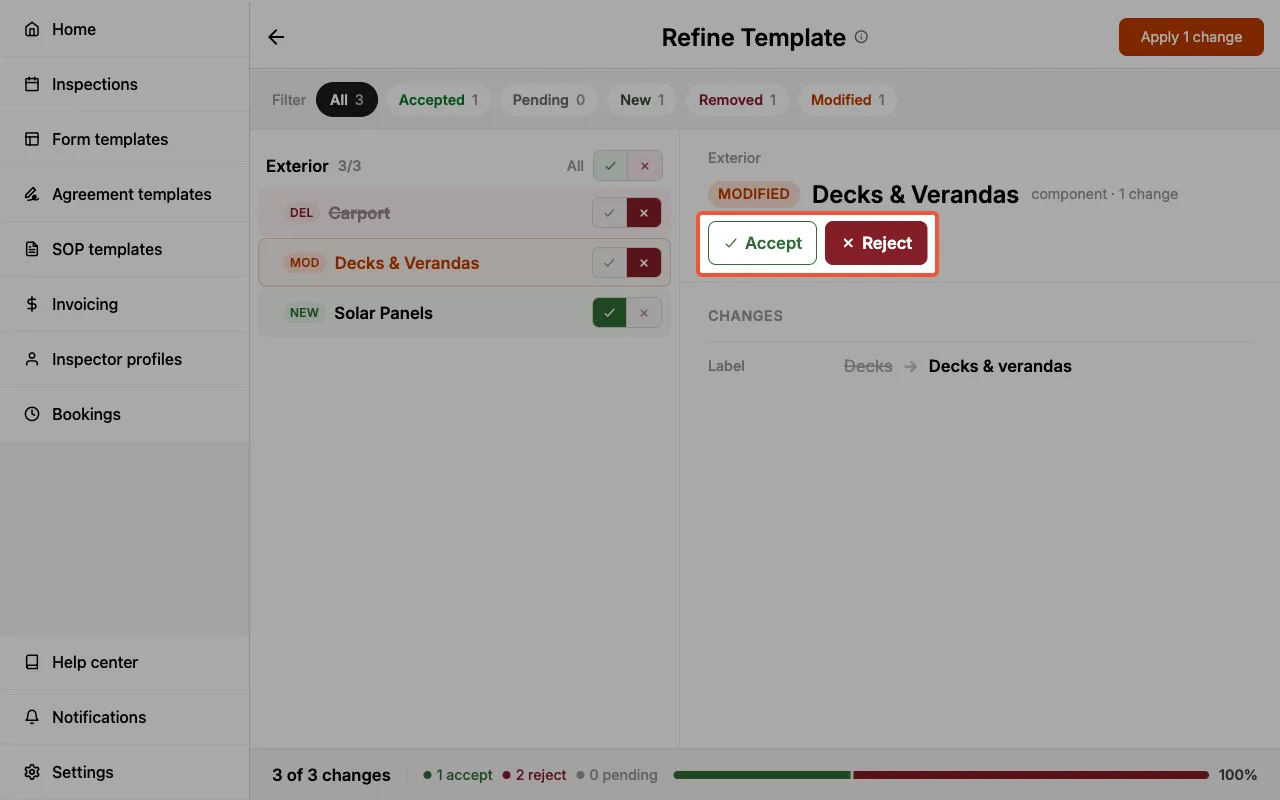
Reviewing is completely safe: nothing is saved to your Form Template until you apply your accepted changes. If the form and template already match, the page shows No differences found instead.
Applying changes
- Select the
Apply changesbutton in the top-right corner. Its label shows the number of changes you have accepted, e.g.,Apply 1 change. - A confirmation summarizes your accepted, rejected, and pending decisions. Only accepted changes are saved to the template. Rejected and pending changes leave the template unchanged, and you can review them again next time.
- Confirm to apply the accepted changes to your Form Template.
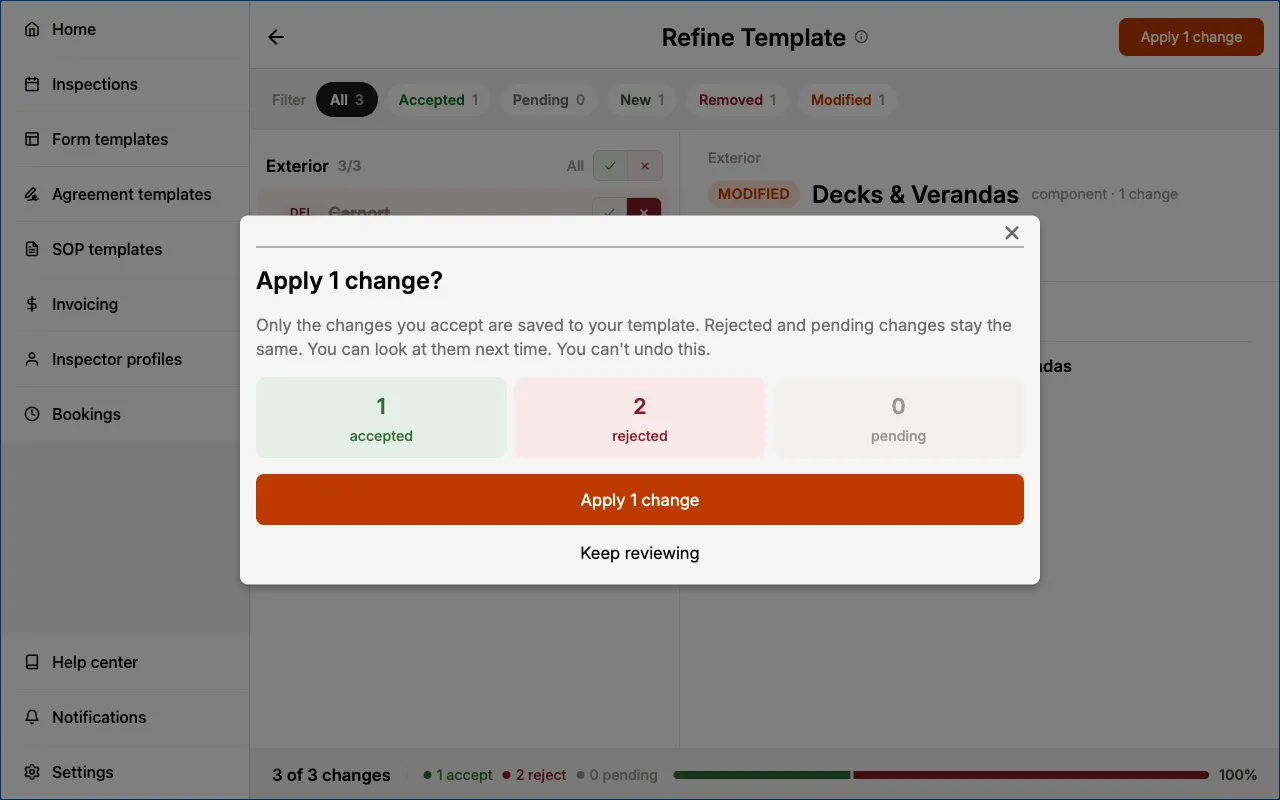
Once applied, a confirmation screen summarizes what was saved. Select Review again if you would like to revisit the remaining changes.
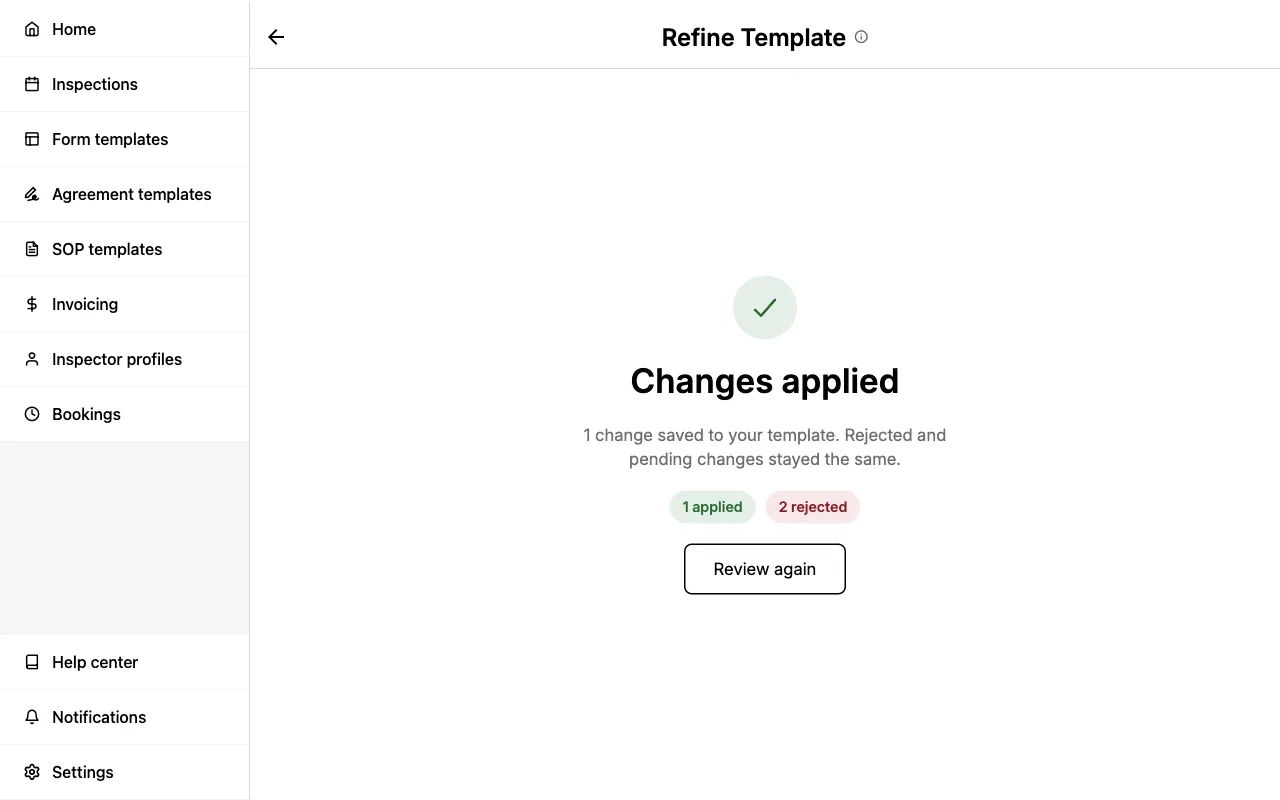
Applying changes cannot be undone. Review your accepted changes carefully, especially removals: accepting a removal deletes that item, and everything inside it, from the Form Template.
Supplementary Forms
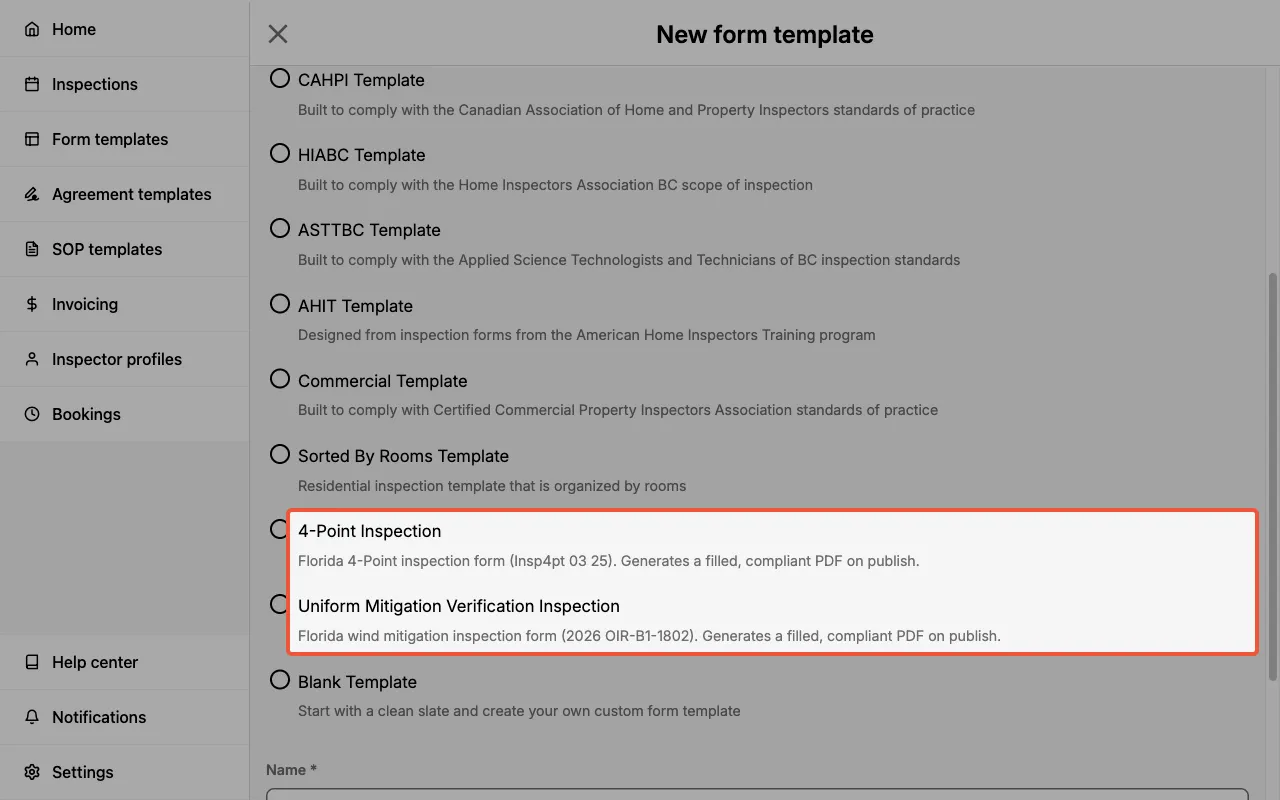
Supplementary forms are specialized insurance forms that you complete alongside your main inspection and deliver as a separate, compliant PDF. Eneris includes two ready-to-use supplementary form templates for the Florida market:
- 4-Point Inspection: the Florida 4-Point inspection form (Insp4pt 03 25), covering the four systems insurers care about most: roof, electrical, HVAC, and plumbing.
- Uniform Mitigation Verification Inspection: the Florida wind mitigation form (2026 OIR-B1-1802), documenting the features that protect a home against wind damage.
Both are kept up to date with the latest official forms, and each generates a filled, flattened, insurer-ready PDF when you publish.
Supplementary forms are designed for Florida insurance inspections and follow the official Florida OIR forms. They produce a PDF only (no web or summary report). The form fields, sections, and layout are fixed to stay compliant, so these templates are used as-is rather than customized like a standard Form Template.
Adding a supplementary form
You add a supplementary form the same way you add any other template, by first creating it from the built-in template and then adding it to an inspection:
- Select
Form templatesfrom the sidebar. - Select
Create new form template. - With
Create newselected, scroll theCreate fromlist and choose 4-Point Inspection or Uniform Mitigation Verification Inspection. - Enter a
Namefor the template and selectCreate new. - Add the template to an inspection, either when creating a new Inspection or by adding it to an existing one (see Selecting a Form Template above).
Inspectors typically complete the main home inspection first, then create the 4-Point or wind mitigation form for the same property. Adding the supplementary form to the same Inspection lets Eneris carry over the property and client details for you.
Auto-populated details
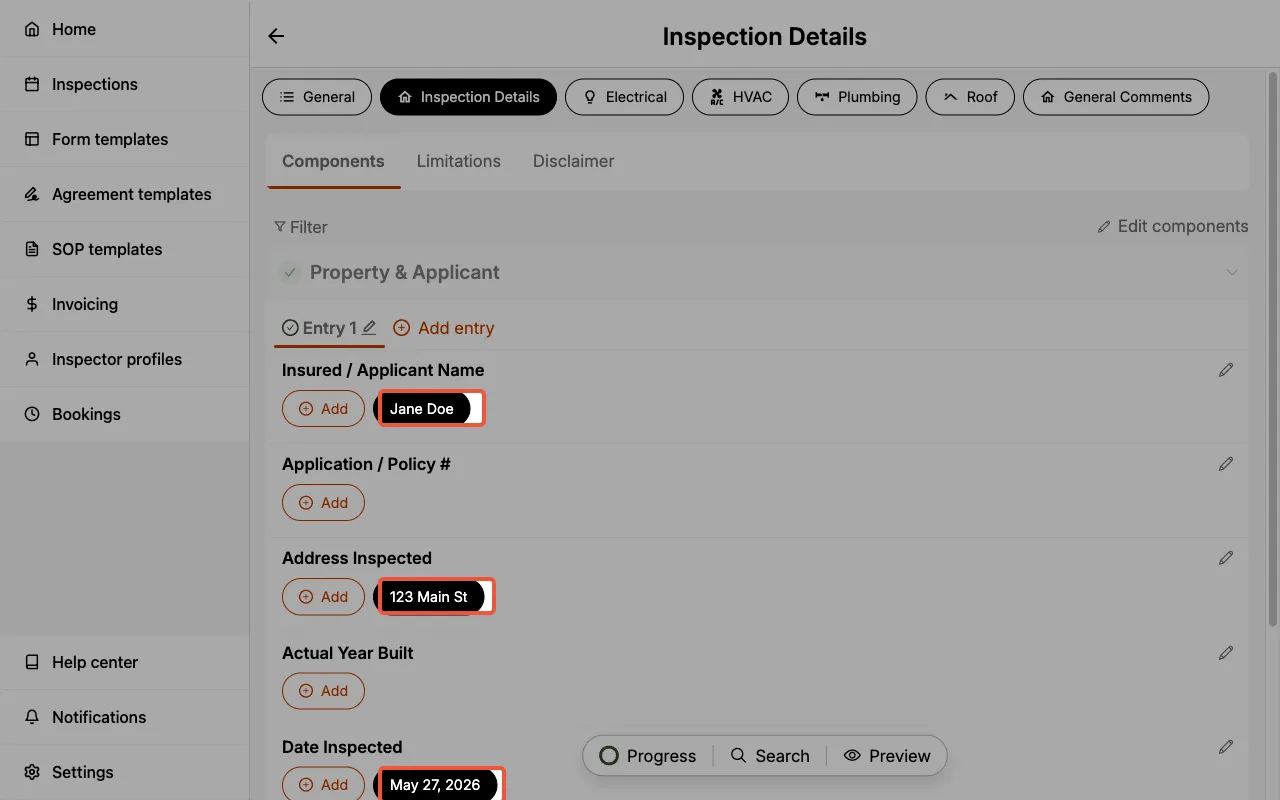
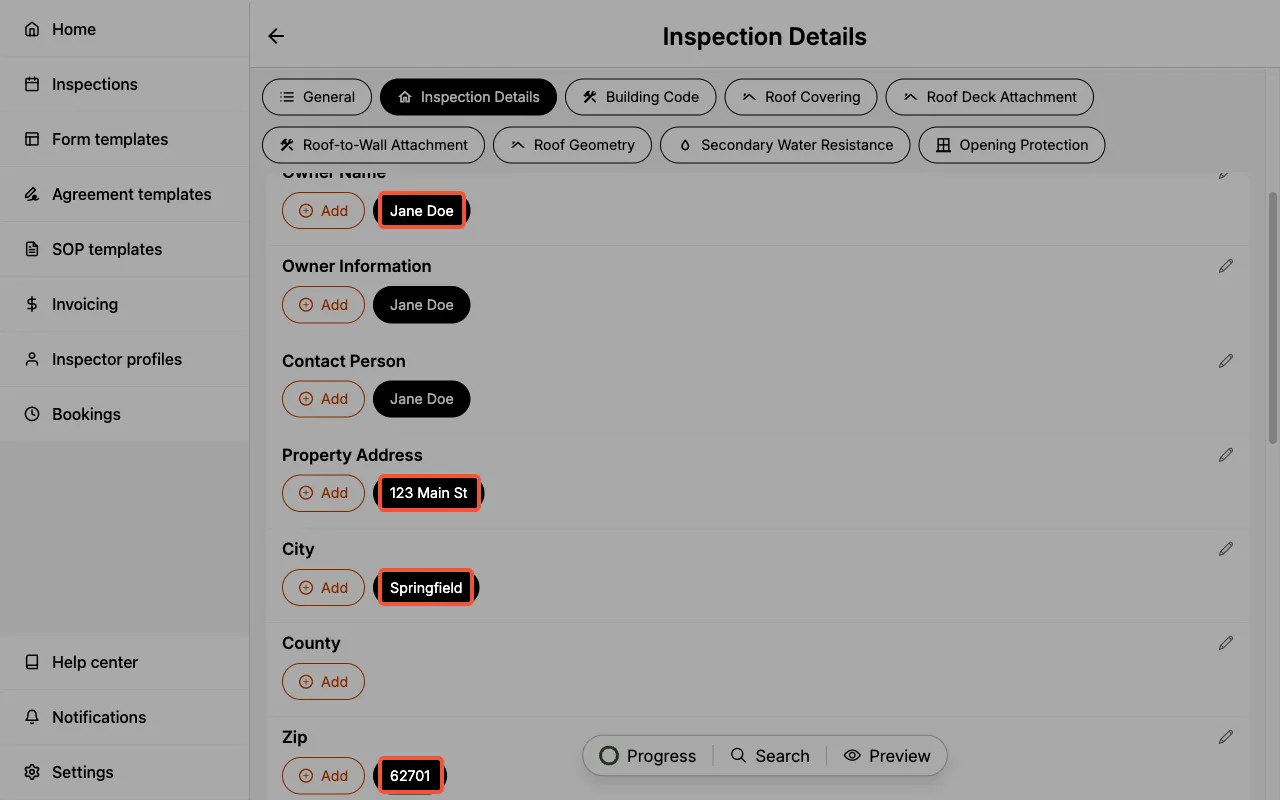
When you add a supplementary form to an inspection, Eneris pre-fills the form from the inspection so you don't have to re-type information you already captured. Depending on the form, this includes:
- Owner / client name
- Property address, city, and ZIP code
- Phone number and email
- Year built and number of stories
- Inspection date
Every pre-filled value remains editable, so you can review and adjust anything before publishing. The form is split into the same sections as the official document, for example Inspection Details, Electrical, HVAC, Plumbing, and Roof on the 4-Point form.
- 4-Point Inspection
- Wind Mitigation
Photos and signature
Photos you attach to a supplementary form are automatically organized by section (for example, Electrical, HVAC, Plumbing, and Roof) and laid out on dedicated photo pages in the generated PDF, each with a caption. Your inspector profile signature is embedded on the form automatically, so the published PDF is ready to send.
Publishing and sharing
Publish a supplementary form just like any other report. On publish, Eneris fills the official form, merges in any photo pages, and produces a single compliant PDF.
- 4-Point Inspection
- Wind Mitigation
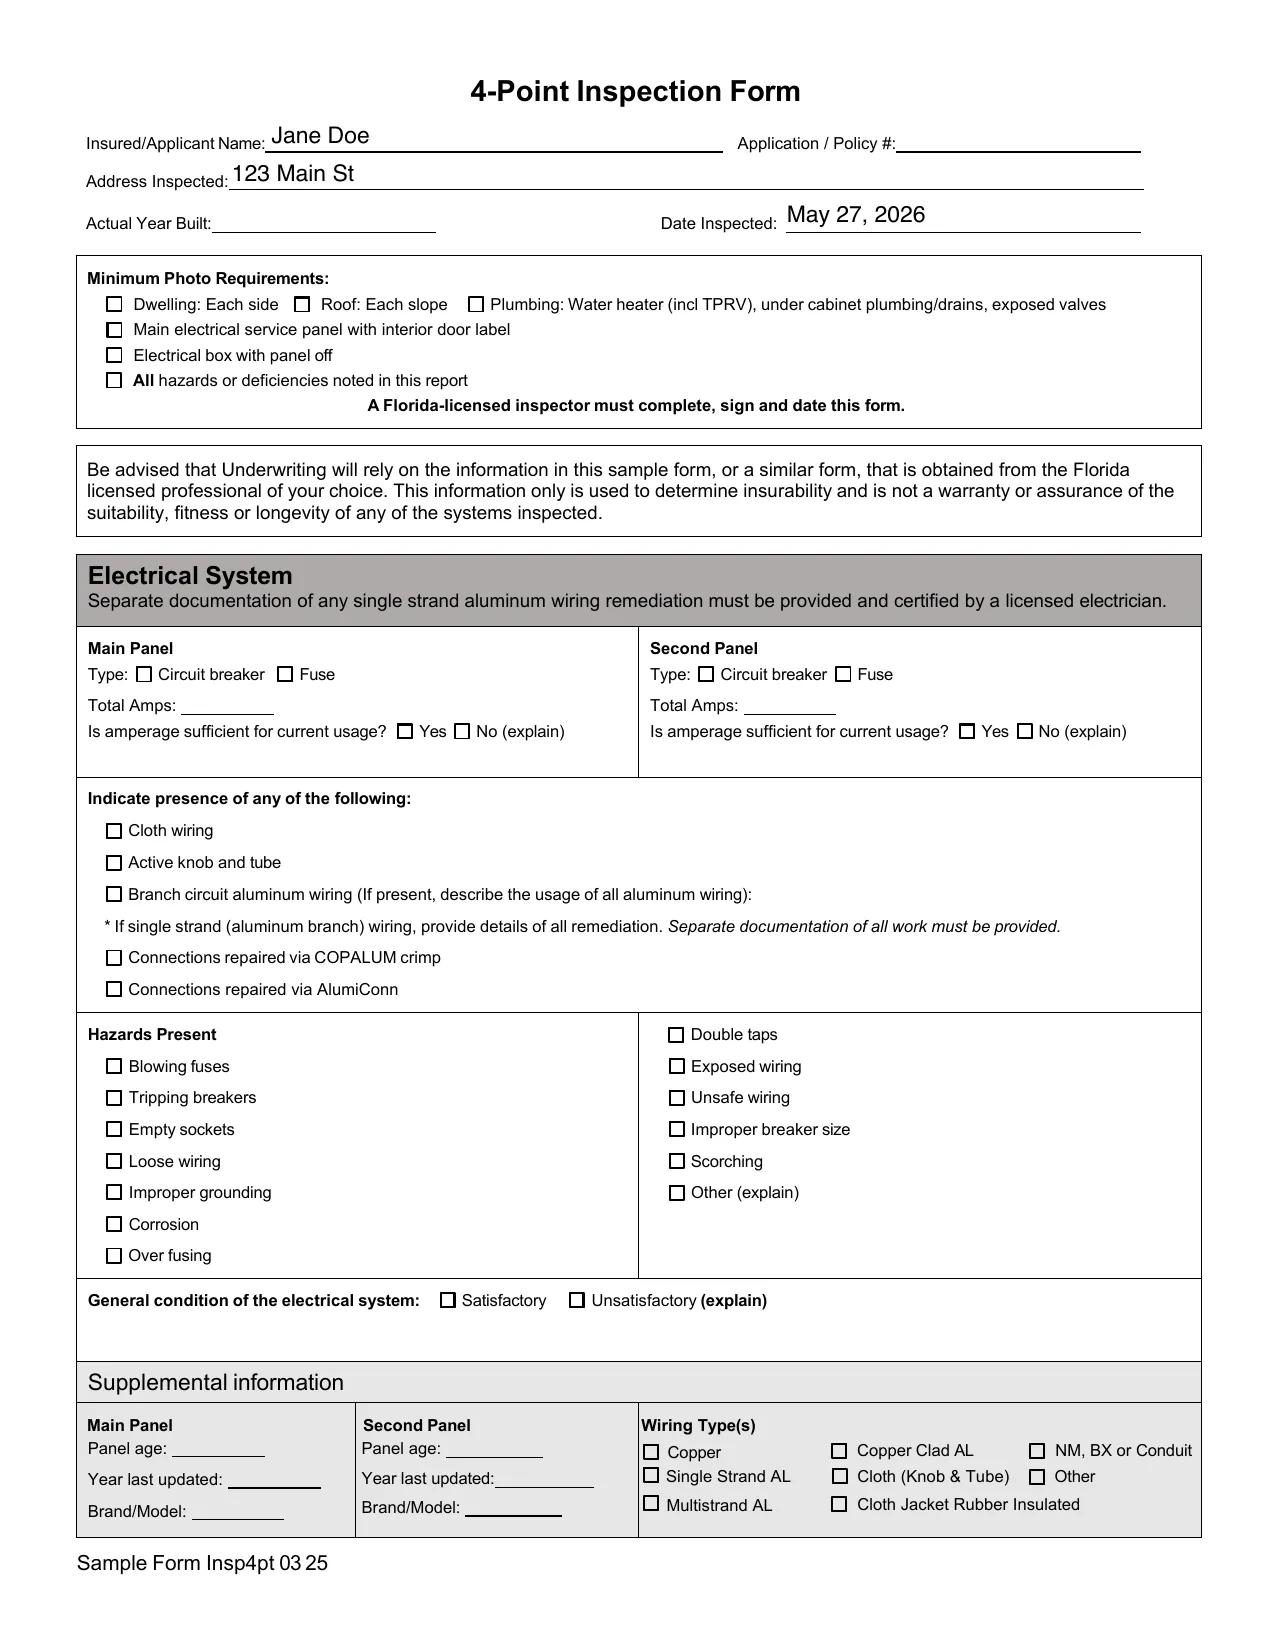
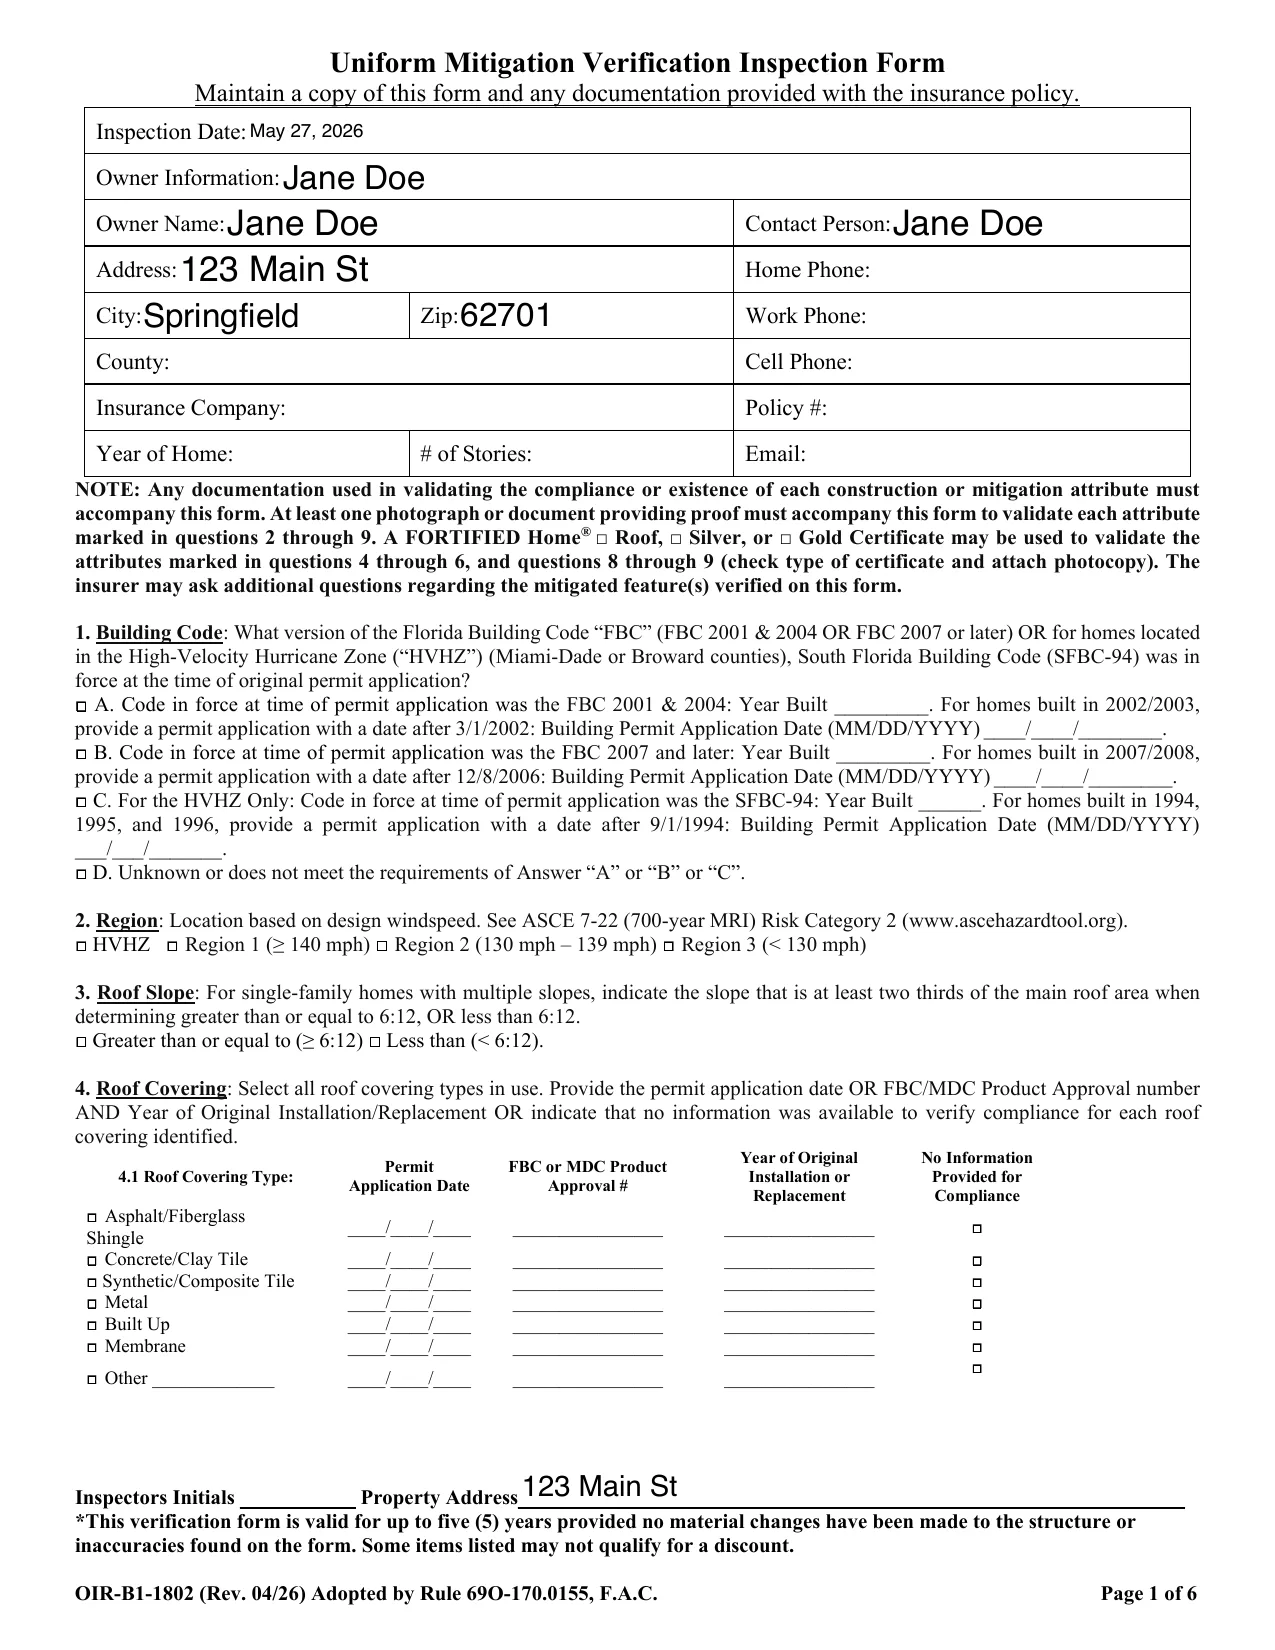
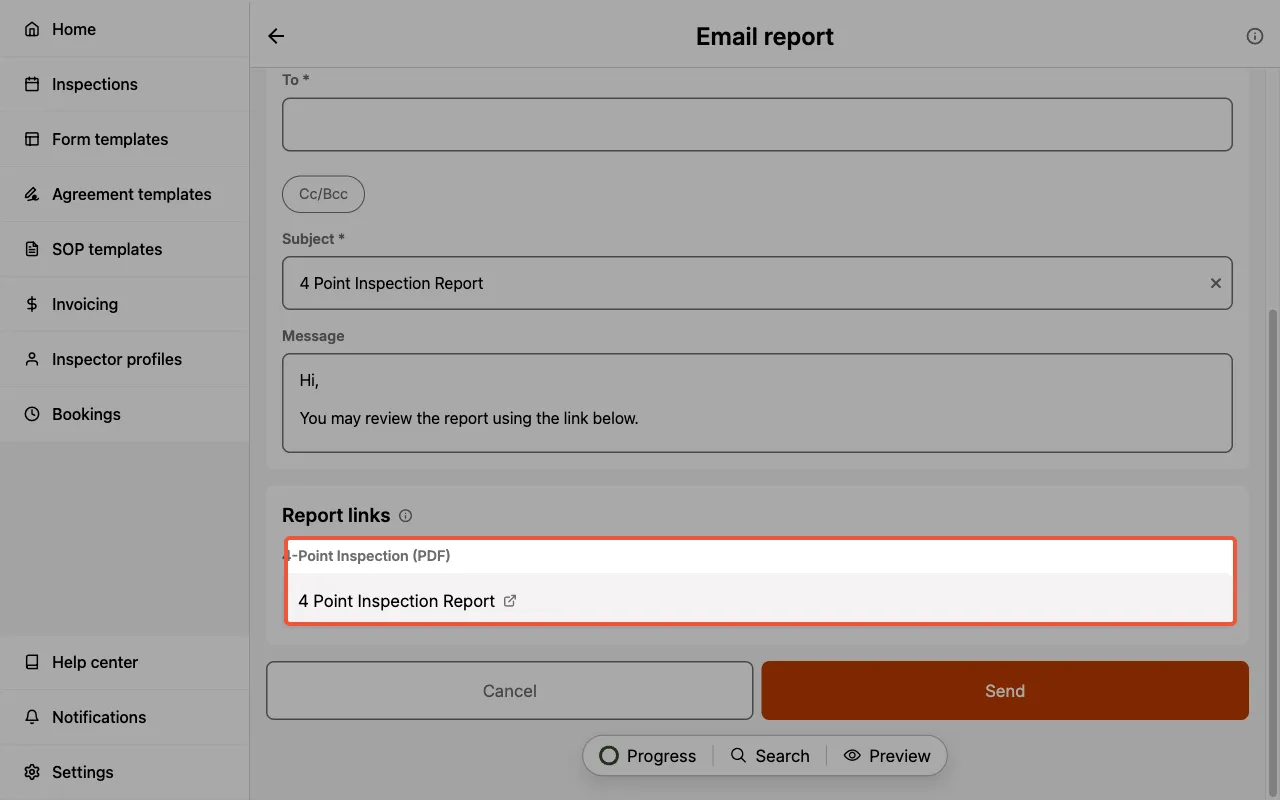
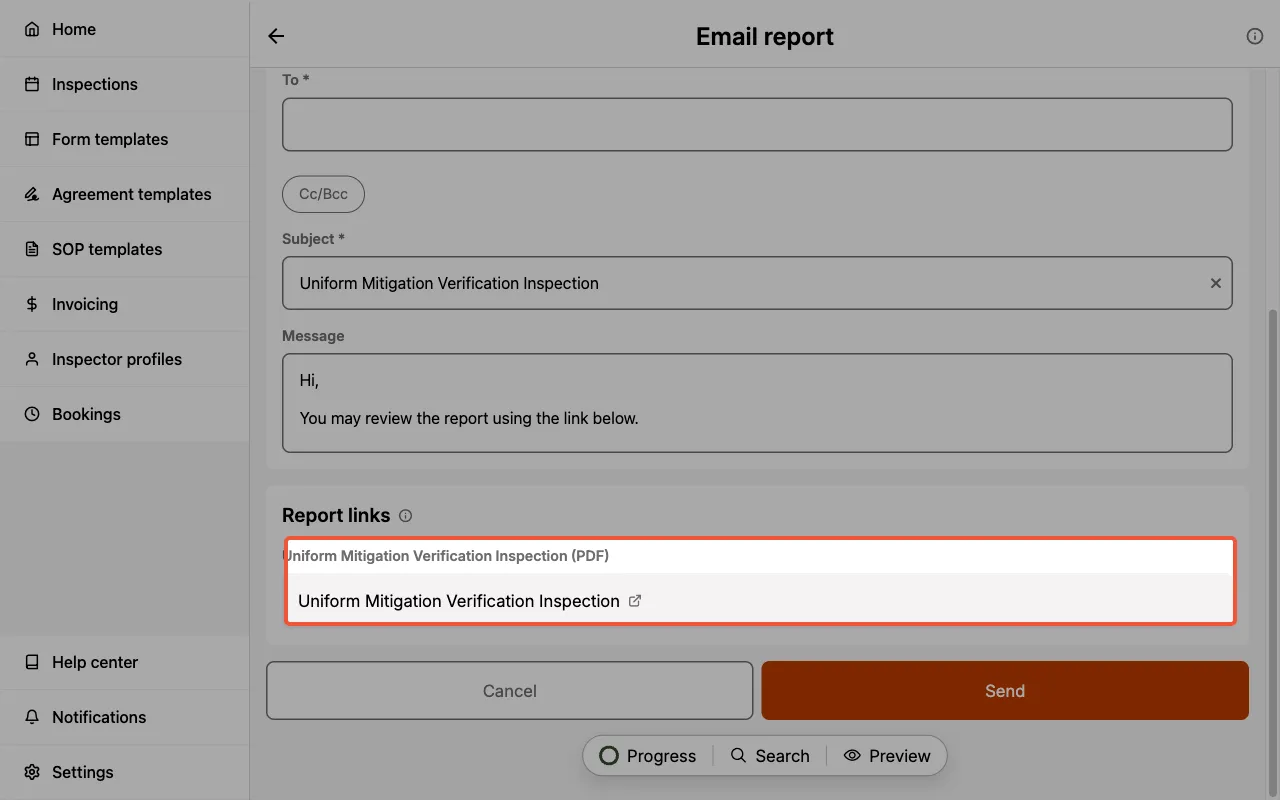
The PDF appears as 4-Point Inspection (PDF) or Uniform Mitigation Verification Inspection (PDF), ready to view or share by email alongside your main inspection report.
- 4-Point Inspection
- Wind Mitigation